Apparently, I can’t seem to follow directions. My brother-in-law Donny wanted me to build him a dresser and he gave me specific guidelines and dimensions. And I was all, “heck yeah! Let’s do this!”
These were his requests:
– no more than 42″ high
– 3 small drawers across the top
– 6 large drawers, in 2 columns, underneath
Basically, this.
And I came back with these plans.
Image may be NSFW.
Clik here to view.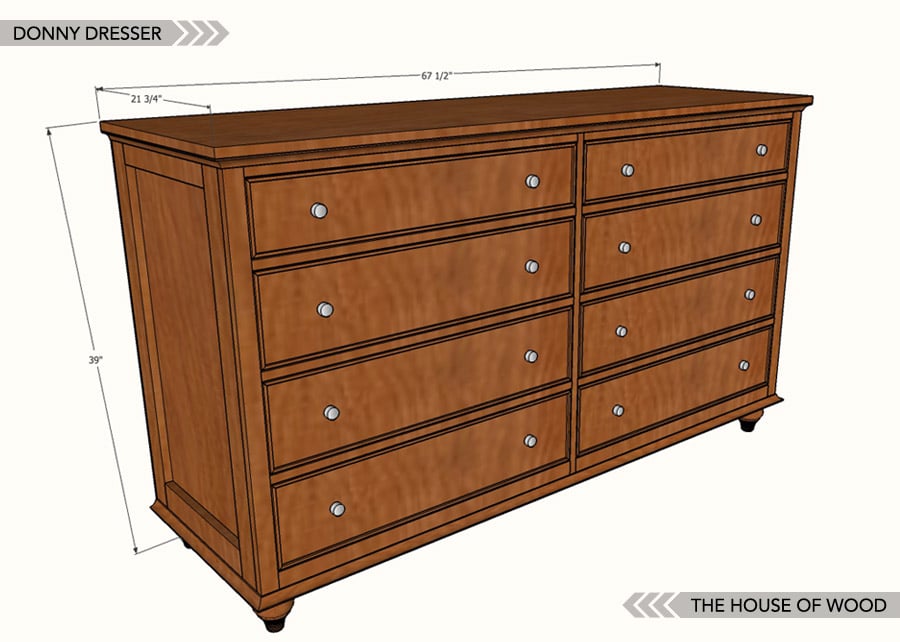
Yeah. I knowwwww.
In my defense, I was fully engrossed in the new House of Cards season, so I wasn’t really paying attention to what I was sketching up. I mean, who can blame me, with Claire Underwood and her ruthless perfection all up in my face?
So back to the drawing board I went and came back with this:
Image may be NSFW.
Clik here to view.
I can feel you judging me. Yes, I am fully aware that I’m moving away from the mark. My husband says it’s because I was born with no sense of direction.
Wow, that sounded harsher than I intended.
Anyway, I have no plans to actually build this dresser, but when I asked you, my Facebook and Instagram friends, if you’d like to have these plans available, I received an overwhelming “yes we need those plans!” response. So here you go! I must warn you though, because I haven’t built this piece myself, I can only hope the plans are correct. I double- and triple-checked everything, but until you physically carry out a plan, you can never be 100% sure. That being said, if you build this, I’d recommend you measure and cut as you go, as opposed to cutting all the pieces beforehand and then assembling. And please let me know if I need to make any revisions or modifications. Oh, and definitely send pictures. I will love you forever.
Click here to download the PDF Plans for this 11-Drawer Dresser.
*This post contains affiliate links. To read my full disclosure policy, click here.
Materials:
- 1-1/2 – Sheets of 3/4″ Plywood
- 3 – Sheets of 1/4″ Plywood
- 8 – 1x2x10′
- 2 – 1x3x10′
- 3 – 1x4x10′
- 7 – 1x6x10′
- 3 – 1x8x8′
- 19 feet of 3/4″ Cove Moulding (optional)
- 62 feet of 1/4″ x 1/4″ Moulding (optional)
- 4 Furniture Bun Feet
- 3 – Sets of 20″ Side-Mount Drawer Slides
- 8 – Wood Center-Mount Drawer Slides
- 19 Drawer Knobs or Pulls
- 1-1/4″ Pocket Hole Screws
- 1-1/4″ Brad Nails or Staples
- 3/4″ Brad Nails
- 1-1/4″ Wood Screws
- 3/4″ Veneer Edge Banding
- Wood Glue
Cut List:
- 2 – 3/4″ plywood @ 38-1/4″ x 20-3/4″ (sides)
- 4 – 1×4 @ 38-1/4″ (side trim)
- 4 – 1×4 @ 13-3/4″ (side trim)
- 1 – 3/4″ plywood @ 66″ x 21-1/2″ (base)
- 2 – 1×2 @ 38-1/4″ (front trim)
- 12 – 1×2 @ 63″ (carcass supports)
- 4 – 1×2 @ 7-1/2″ (large drawer divider trim)
- 2 – 1×2 @ 3-3/4″ (small drawer divider trim)
- 4 – 1×4 @ 20-3/4″ (small drawer slide supports)
- 1 – 3/4″ plywood @ 67-1/2″ x 22-1/4″ (top)
- 1 – 1/4″ plywood @ 66″ x 39″ (back)
Optional trim:
- 2 – 3/4″ cove moulding @ 67-1/2″
- 4 – 3/4″ cove moulding @ 22-1/4″
- 6 – 1/4″ moulding @ 19-3/4″
- 6 – 1/4″ moulding @ 3-1/2″
- 16 – 1/4″ moulding @ 30-1/2″
- 16 – 1/4″ moulding @ 7-1/4″
Small Drawers (3):
- 6 – 1×3 @ 20″ (sides)
- 6 – 1×3 @ 17-1/2″ (front/back)
- 3 – 1/4″ plywood @ 20″ x 19″ (bottom)
- 3 – 1×4 @ 19-3/4″ (face)
Large Drawers (8):
- 16 – 1×6 @ 28″ (front/back)
- 16 – 1×6 @ 20″ (sides)
- 8 – 1/4″ plywood @ 28-1/2″ x 19″ (bottom)
- 8 – 1×8 @ 30-1/2″ (face)
Tools:
- Tape Measure
- Pencil
- Speed Square
- Drill with Countersink Drill Bit
- Miter Saw
- Table Saw or Router
- Kreg Jig
- Kreg Rip-Cut
- Brad Nailer or Stapler
- Iron
- Safety Glasses
- Hearing Protection
Step 1
Build two sides. Drill 3/4″ pocket holes facing up, down, and toward the front into plywood panels. Attach the 1×4 boards with 1-1/4″ brad nails and glue. Optional: add additional trim as shown. Measure and cut to fit, mitering ends at a 45º angle. Attach with 3/4″ brad nails and glue.
Image may be NSFW.
Clik here to view.
Step 2
Attach the side panels to the base with 1-1/4″ pocket hole screws and glue. The side panels should be flush to the back so that there is a 3/4″ inset on the front. You can choose to attach the bun feet at this step or later in the build.
Image may be NSFW.
Clik here to view.
Step 3
Attach front trim with 1-1/4″ pocket hole screws and glue.
Image may be NSFW.
Clik here to view.
Step 4
Build the carcass. Attach 1×2 supports with 3/4″ pocket holes and 1-1/4″ pocket hole screws and glue. To keep the 1x2s from spinning, I also like to shoot a couple 1-1/4″ brad nails on the ends.
Image may be NSFW.
Clik here to view.
Step 5
Attach the drawer divider trim with 3/4″ pocket holes and 1-1/4″ pocket hole screws and glue.
Image may be NSFW.
Clik here to view.
Step 6
Attach the 1×4 boards as shown. Use 3/4″ pocket holes and 1-1/4″ pocket hole screws and glue. The side-mount drawer slides for the top 3 drawers will be attached to these boards.
Image may be NSFW.
Clik here to view.
Step 7
Attach wood center-mount drawer slides as shown. You’ll need to measure and cut them to fit. Pre-drill pilot holes and use countersunk wood screws and glue.
Image may be NSFW.
Clik here to view.
Step 8
Attach top with 1-1/4″ pocket hole screws and glue. Iron on 3/4″ veneer edge banding to hide the raw plywood edges. The top should be flush to the back, and have a 3/4″ overhang on the front and sides.
Image may be NSFW.
Clik here to view.
Step 9
Attach 3/4″ cove moulding. Measure and cut to fit, mitering ends at a 45º angle. Use 3/4″ brad nails and glue.
Image may be NSFW.
Clik here to view.
Step 10
Construct the small drawer boxes by drilling 3/4″ pocket holes on the outsides of the 1×3 boards (pocket holes will be hidden by drawer face in later steps) and attach with 1-1/4″ pocket hole screws and glue. Be sure to check for square and adjust as needed. Attach the bottom panel with 3/4″ staples and glue. For standard metal side-mount slides, there is usually a 1/2″ clearance on each side. Measure the cabinet opening and build drawers to fit.
Image may be NSFW.
Clik here to view.
Steps 11 & 12
Using a table saw or router, cut a 1/4″ dado as shown. The plywood panel will slide into this slot so that it ‘floats’ in the drawer box. Drill 3/4″ pocket holes on the outsides of the 1x6s (pocket holes will be hidden by drawer face in later steps). Measure the back 1×6 board and determine where to attach the drawer slide. Notch out the back so that the drawer slide will sit flush to the bottom of the drawer box (see diagram #12). Construct drawer box with 1-1/4″ pocket hole screws.
Image may be NSFW.
Clik here to view.
Image may be NSFW.
Clik here to view.
Step 13
Install drawers. There should be a 1″ inset from the front to allow space for the 3/4″ drawer face and 1/4″ drawer face trim.
Image may be NSFW.
Clik here to view.
Step 14
Attach drawer face with 1-1/4″ wood screws and glue, allowing a 1/8″ gap around all sides.
Image may be NSFW.
Clik here to view.
Step 15
Attach drawer face trim and install knobs or pulls. Measure and cut trim to fit, mitering ends at a 45º angle. Use 3/4″ brad nails and glue to attach.
Image may be NSFW.
Clik here to view.
Step 16
Attach back panel with 3/4″ staples and glue.
Image may be NSFW.
Clik here to view.
There ya go! This is quite a beefy dresser with a whole lot of storage, so I do hope you build it! Again, measure and cut as you go, follow all safety precautions, and let me know how it turns out! Thanks for stopping by – happy building!
The post Free Plans: DIY 11-Drawer Dresser appeared first on The House of Wood.